User Guide
- 1. Target user profile
- 2. Introduction
- 3. Quick Start
- 4. Features and usage
- 5. Basic Commands
- 6. Finding and Filtering
- 7. Graphs
- 8. Tag Goals
- 9. Automated Cleaning
- 10. Command Guide
1. Target user profile
University students with poor time management skills who are struggling to allocate time efficiently for the numerous deadlines/tasks.
2. Introduction
Jikan is a CLI time management tool that allows you to track the amount of time that you spend on different activities so as to ensure that time is allocated more efficiently to the different activities (i.e spending too much/too little time on an activity) . This user guide will show you how to use the program effectively.
3. Quick Start
- Ensure that you have Java 11 or above installed.
- Download the jar and tag.csv file of the latest version of
Jikanfrom here. - Create an empty folder and put the Jikan.jar file inside.
- Within the folder, create a separate folder named
tagand place thetag.csvfile inside the tag folder. - Open command prompt and navigate to the folder. Run the jar file using
java -jar jikan.jar.
4. Features and usage
Jikan lets you record how much time you spend on various activities so that you can easily see what took up the most time today / this week / this month. (In the example below, we use the example of a student tracking his/her schoolwork, but Jikan can be used for more than just that!)
To start, record your first activity using the start ACTIVITY_NAME command.
Add some tags to your activities to group similar activities together using /t. Tags help you group activities of the same type together,
in this example, we use the tags feature to label activities according to their module code.
(Note that each activity can only store two tags at maximum.)
Add allocated time to your activities using /a. This allows users to set aside how much time they would like to spend on an activity and
keep track on whether they are spending too much or too little time for that particular activity.
When you are done with the activity, or want to move onto something else, tell Jikan to end and the Activity time will be recorded and saved to your list.
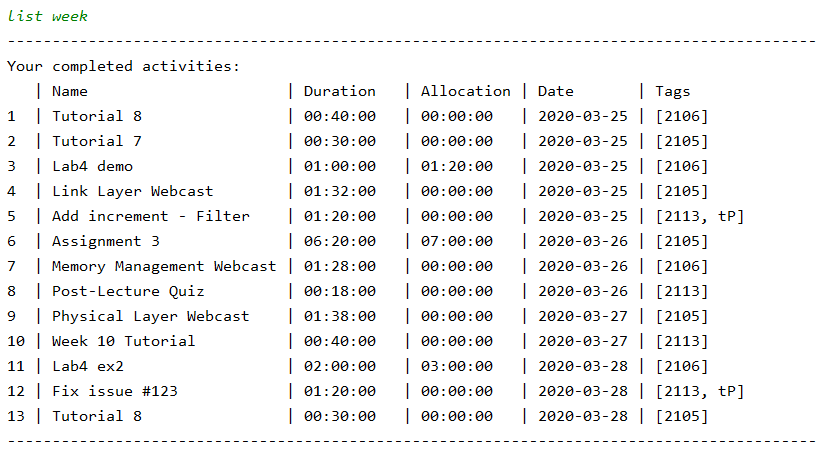
You can view all your activities using the list command. Or view all your activities over a period of time by using list with extra parameters. For example list week will return a list of all activities this current week, as shown below.
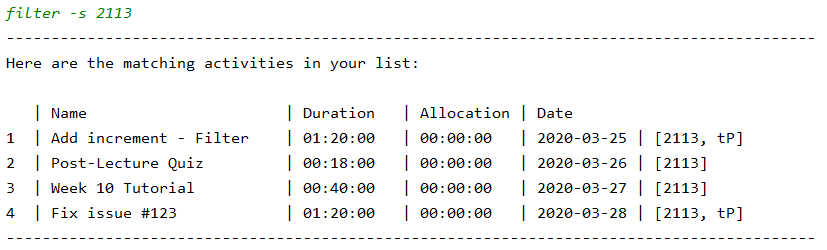
The list still looks very cluttered, we can reduce it further! Want to find everything you did for CS2113 this week? Filter out the activities you want to see using the find or filter command. This is our list after filtering out all our activities tagged as 2113. (the -s flag tells Jikan to search our last shown list, i.e. the list of activities this week in this case)
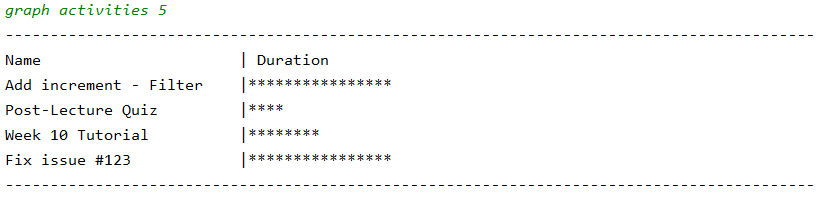
To easily see what took up the most of your time out of all the 2113 activities, use the graph command to view a chart of your activities.
Curious about what module took up the most time this week? We can use the graph tags command on our weekly activity list to find out.

Evidently, it was CS2105.
Not done with an activity and want to continue on it? Use the continue command to continue recording time for a previously started activity.
Finally, when you’re done and want to close the app, simply say bye and Jikan will exit.
This is just a quick overview of what Jikan can do for you. For more details on each individual command, read the command guide below.
5. Basic Commands
5.1 Starting an activity: start
Usage: Starts recording the time for a new activity.
Format: start ACTIVITY_NAME /a ALLOCATED_TIME /t TAGS
ACTIVITY_NAMEcan contains spaces and must be less than 25 characters.ACTIVITY_NAMEmust also be unique (should the user start an already existing activity, the option tocontinuewill be given).ALLOCATED_TIMEshould be of the format [HH:MM:SS] and cannot exceed 23:59:59.TAGSmust be single spaced separated and a maximum of 2 tags can be stored.ALLOCATED_TIMEandTAGSare optional.
Example:
start assignment /a 01:30:00 /t CS1010
start GER1000 quiz /t GER GEmod
start revision
Discouraged Names:
- The following strings are used as parameters for other commands, and hence should be avoided in the
ACTIVITY_NAMEandTAGSas it may interfere with Jikan running smoothly:/,;,/a,/t,/a,-s,/en,/ea,/d,/n,/g
5.2 Continuing an activity: continue
Usage: Continues recording the time of an activity that you have previously started.
Format: continue ACTIVITY_NAME
ACTIVITY_NAMEmust be an existing activity in the activity list.
Example:
continue revision
5.3 Ending an activity: end
Usage: Stops recording the time for an ongoing activity and stores it into the activity list.
Format: end
- An activity must be started or continued before it can be ended.
5.4 Aborting an activity: abort
Usage: Aborts the current activity and does not save it to the activity list.
Format: abort
- An activity must be started or continued before it can be ended.
5.5 Delete an activity: delete
Usage: Deletes an activity in the activity list.
Format: delete ACTIVITY_NAME
5.6 Listing activities: list
Usage: Displays a list of the completed activities.
Format: list TIME_PERIOD
- If no
TIME_PERIODis given, all activities will be listed. TIME_PERIODcan bedayorweek- To list activities in a specific month of the current year, use
list month MONTH_NAMEwhereMONTH_NAMEmust be spelled out in full (i.e. January and not Jan). - Otherwise,
TIME_PERIODshould be of the format [dd/MM/yyyy] or [yyyy-MM-dd] TIME_PERIODcan either be a specific date or over a range.
Example:
listlists all activities.list month aprillists all activities in April.list weekorlist weeklylists all activities in the current week.list week 01/01/2020lists all activities in the week of 01/01/2020.list dayorlist dailylists all activities in the current day.list yesterdaylists all activities completed the day before.list 01/01/2020orlist 2020-01-01lists all activities completed on 1 Jan 2020.list 01/01/2020 20/02/2020lists all activities than fall within 1 Jan 2020 and 20 Feb 2020.
5.7 Editing an activity: edit
Usage: Edits the name or allocated time of an activity in the activity list.
Format
edit ACTIVITY_NAME /en NEW_NAMEedit ACTIVITY_NAME /ea NEW_ALLOCATED_TIMENEW_ALLOCATED_TIMEshould be in the format [HH:MM:SS]
Example:
edit CS1010 assignment /en CS1010 assignment 2 Activity name is edited to CS1010 assignment 2
edit CS1010 assignment /ea 10:00:00 Allocated time for activity is edited to 10:00:00
6. Finding and Filtering
By using find and filter commands, the user can reduce clutter and zoom-in to specific activities containing certain keywords or tags. The sub-query flag -s allows chaining any combination of find and filter commands to further reduce clutter. These features are particularly useful when the visualisation of time spent with minimal clutter is required.
6.1 Finding Activities by Name: find
Usage: Users can request for a sub-list of activities that has names which contain any of the given keywords. If there are more than one keyword, each keyword should be separated with ` / `.
Format:
find KEYWORDfind KEYWORD1 / KEYWORD2 / KEYWORD3
6.2 Filtering Activities by Tags: filter
Usage: Users can request for a sub-list of activities that has specific tags. Each tag should be space separated.
Format:
filter TAGNAMEfilter TAGNAME1 TAGNAME2
6.3 Chaining Finds & Filters: -s
Usage: Users can provide the find and filter command on the last shown list (also compatible after a list
command) by providing the -s flag after each find or filter command.
Format:
find -s KEYWORDfilter -s TAGNAMEfilter -s TAGNAME1 TAGNAME2find -s KEYWORD1 / KEYWORD2 / KEYWORD3
Example:
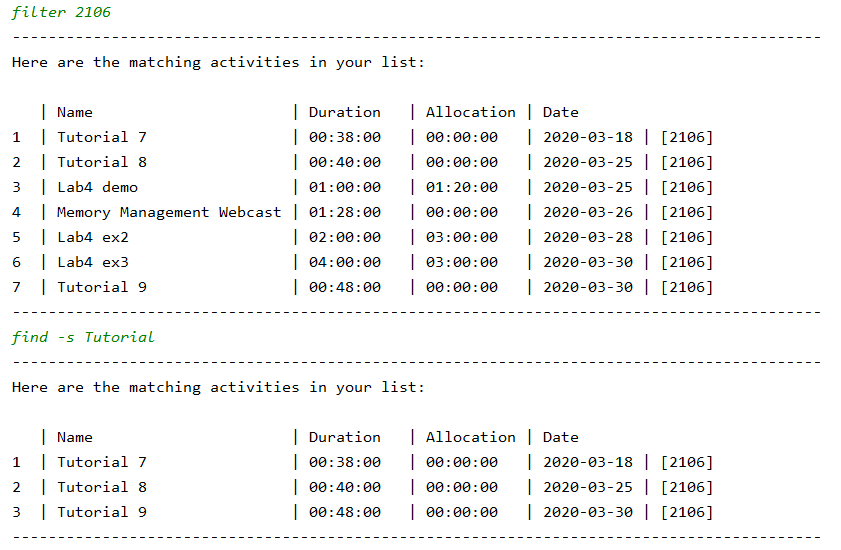
If we want to find all CS2106 tutorials, we can first use filter 2106 to filter out all activities tagged 2106, then use the find command with the flag, find -s Tutorial to get a list of all 2106 Tutorials.
6.3.1 Single Input Chaining: ;
Usage: Users can achieve the same outcome as multiple -s chaining with a single input. This is done by separating
find and filter commands with ` ; `.
Examples:
filter TAGNAME ; find KEYWORD1 ; find KEYWORD2filter -s TAGNAME ; find KEYWORD1 ; find KEYWORD2
Note: -s is only relevant in the first command of the entire input string, as subsequent commands are automatically chained.
7. Graphs
By using the following commands, users can get a visual representation of the time spent on each activity and their current progress. The 3 types of graphs are :
- Activity time graph - Total time spent on each activity:
graph activities SCALE - Tags time graph - Total time spent on each tag:
graph tags SCALE - Activity allocation graph - Progress of each activity in relation to its allocated time:
graph allocations
Tip: Use find, filter and list commands to reduce clutter before graphing as the graphs are based on the last shown list of activities.
7.1 Activity time graph: graph activities
Usage: View a comparison of the absolute time spent on each activity in the last shown list.
The parameter SCALE refers to the number of minutes represented by each point on the graph.
Note: As the units of SCALE is minutes, if your activity is less than a minute, graph function will not show anything.
Format: graph activities SCALE
Example:
graph activities 10
7.2 Tags time graph: graph tags
Usage: View a comparison of the absolute time spent on each tag in the last shown list.
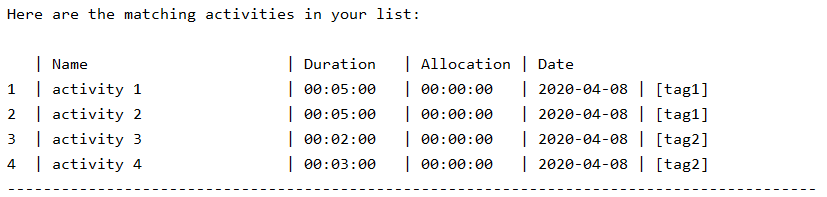
For example, if we graph tags 1 for the activity list above, we will get the following graph:

activity 1 and activity 2 are both tagged tag1 and have a duration of 5 mins.
activity 3 and activity 4 are both tagged tag2 and have a duration of 2 and 3 mins respectively.
Adding up the durations for each tag, we get 10 mins for tag1 and 5 mins for tag2. As we chose the graph to have a scale of 1 min, there are (10 asterisk representing 1 min each) for tag1 and 5 asterisks for tag2 in the graph.
As tags can be used to group activities of a similar nature together (i.e. same module), this feature can be used to easily see what type of activity took up the most time.
Format: graph tags SCALE
Example:
graph tags 1
7.3 Activity allocation graph: graph allocations
Usage: View the progress of activities to see how much time was spent on the activity relative to the allocated time.
Note: Only activities with an ALLOCATED_TIME will be shown.
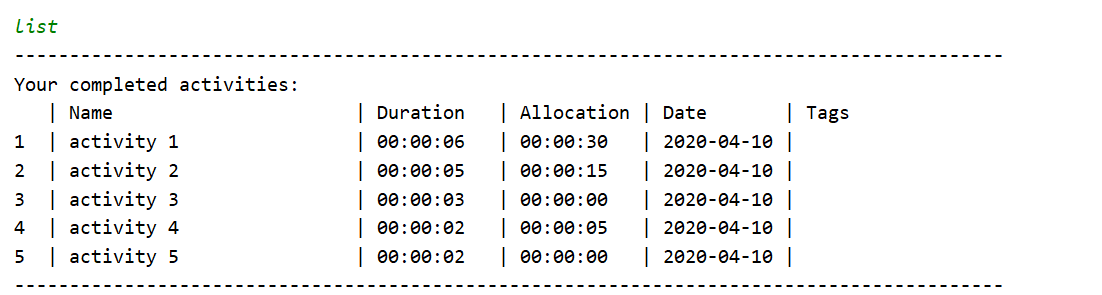
For example, if we graph allocations for the activity list above, we will get the following graph:

activity 3 and activity 5 does not have an allocated time, thus they do not appear in the graph.
The percentage shown in the graph represents the activity’s progress relative to their allocated time. (activity 4 have a duration of 2 seconds while its allocated time was 5 seconds, 2/5 * 100% = 40%. Thus the progress of activity 4 is 40%
as shown in the graph)
Format: graph allocations
7.4 Chaining list, find and filter with graph command:
Using list, find and filter commands you can sieve out the information you wish to be graphed.
Graph Activities Example:

filter 2113 gives all activities tagged 2113, then we can use graph activities 5 to view a graph of the duration for each activity.
Graph Tags Example:
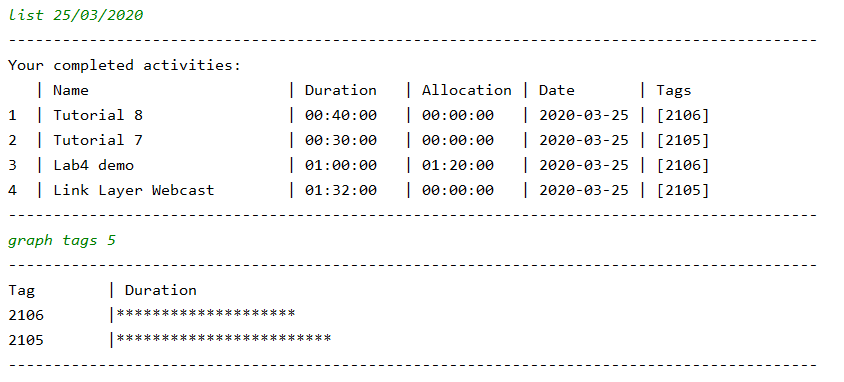
list 25/03/2020 gives all activities completed on 25th March 2020, then we can use graph tags 5 to view the graph of the tags. Each asterisk represents 5 minutes, as indicated by the SCALE parameter of the graph command.
Graph Allocations Example:
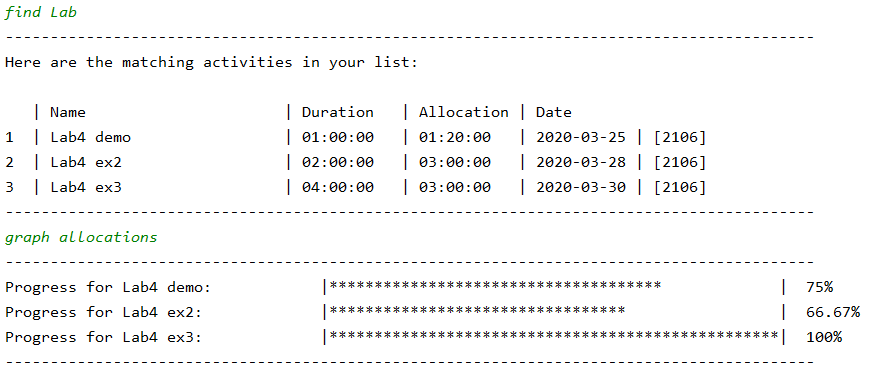
find Lab gives us all Lab activities, then we can use graph allocations to view the progress bar of each of the activities to see how much time was spent on the activity relative to the time that was allocated.
8. Tag Goals
By using the goal command, users can set specific goals for how long they would like to spend on activities under a certain tags as well as view the amount of time they have spent in total for those activities as compared to their goal.
8.1 Set goal: goal TAG_NAME /g DURATION
Usage: Sets a duration goal for a tag
Format: goal TAG_NAME /g DURATION
- The duration should be in the format [HH:MM:SS]
Example: goal core /g 24:00:00 a goal of 24:00:00 is added for the tag core
8.2 Delete goal: goal TAG_NAME /d
Usage: Deletes the duration goal set for the tag.
Format: goal TAG_NAME /d
8.3 View goals: goal
Usage: Displays the tags with their goals, actual time spent on activities with these tags and the difference between the 2 timings.
Format: goal

9. Automated Cleaning
Jikan provides a clean command where users can automate the cleaning of activities from the activity list at application startup.
9.1 Activate cleaning: clean on
Usage: Switch on automated cleaning.
Format: clean on
9.2 Deactivate cleaning: clean off
Usage: Switch off automated cleaning.
Format: clean off
9.3 Set the number of activities to clean: clean /n
Usage: Set a number of activities to clean.
Format: clean /n NUMBER
Note: Once cleaning is switched on, the automated cleaning persists (i.e cleaning will be done at every application startup) until it is switched off.
Example:
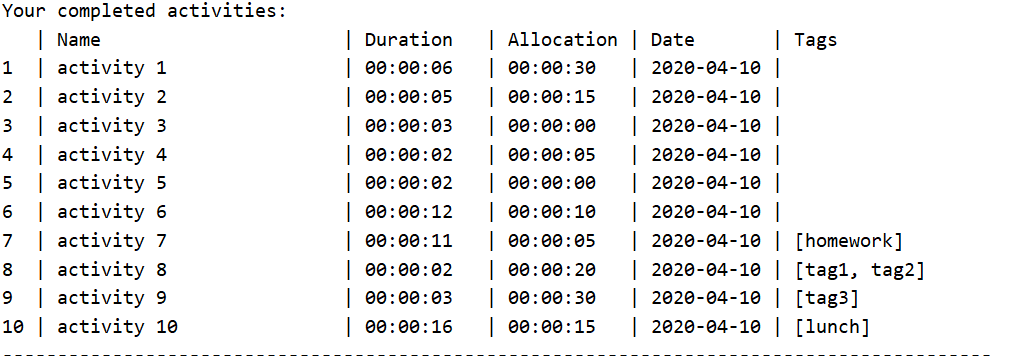
Taking a look at this cluttered activity list, we can see that there are some activities which are done (i.e duration > allocation). Thus, to reduce clutter, we would like to get rid of these done activities.
However, since the list is so huge, it would be troublesome to use the delete function as users will have to manually navigate through the list to identify the done activities and delete them.
This is where the clean command would be useful. See that activity 6, 7 and 10 are done.
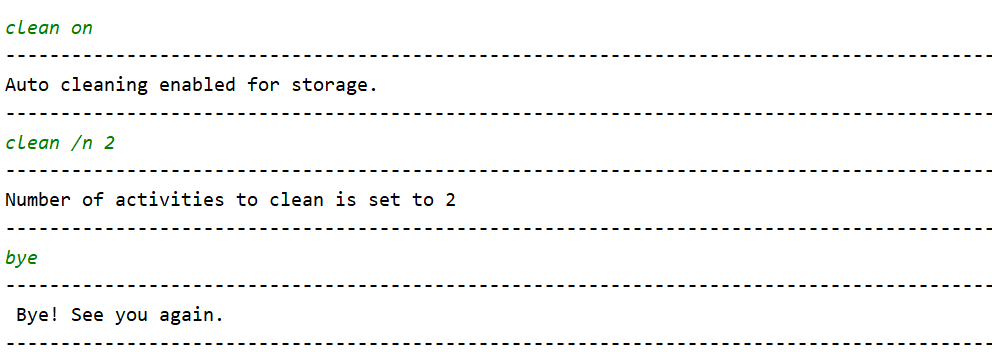
By using the clean command. Users can choose how much of these done activities to clean, for the example here, the number is set to 2.
Upon the next startup, the automated cleaning will do its work and clean the 2 oldest done activities (i.e oldest here is based on date).
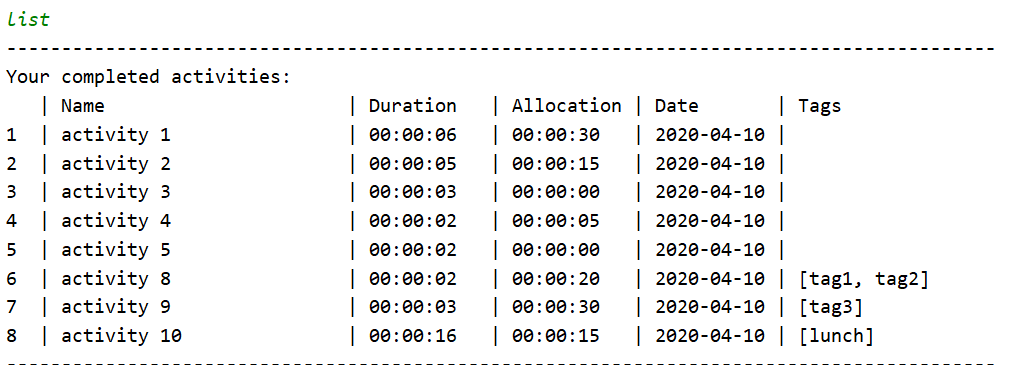
Note that since the user specified to clean only 2 activities, only activity 6 and 7 are cleaned and activity 10 remains in the activity list.
9.4 Automated Cleaning for Logs:
Jikan also provides cleaning for log file which are used to record important information during program execution. This feature will be useful to users who are running this application on systems with limited hardware (small storage space).
9.5 Activate log cleaning: clean log on
Usage: Switch on automated cleaning.
Format: clean log on
9.6 Deactivate log cleaning: clean log off
Usage: Switch off automated cleaning.
Format: clean log off
9.7 Set the number of logs to clean: clean log /n
Usage: Set number of lines of logs to clean.
Format: clean log /n NUMBER
10. Command Guide
- Start an activity:
start ACTVITY_NAME- optional:
start ACTIVITY_NAME /a ALLOCATED_TIME /t TAGS
- optional:
- Abort an activity:
abort - Stop an activity:
end - Continue an activity:
continue ACTIVITY_NAME - List all activities:
list- List today’s activities:
list dayorlist dailyorlist today - List yesterday’s activities:
list yesterday - List this week’s activities:
list weekorlist weekly- List a specific week’s activities by day:
list week DATEorlist weekly DATE, whereDATEis in eitheryyyy-MM-ddordd/MM/yyyyformat
- List a specific week’s activities by day:
- List this month’s activities:
list monthorlist monthly- List a specific month’s activities by day:
list month MONTH_NAMEwhereMONTH_NAMEmust be spelled out in full
- List a specific month’s activities by day:
- List a specific day’s activities:
list DATE, whereDATEis in eitheryyyy-MM-ddordd/MM/yyyyformat - List activities within a time frame:
list DATE1 DATE2, where bothDATE1andDATE2are in eitheryyyy-MM-ddordd/MM/yyyyformat
- List today’s activities:
- Edit an activity:
edit ACTIVITY_NAME [flag]- Edit activity name:
edit ACTIVITY_NAME /en NEW_NAME - Edit activity allocated time:
edit ACTIVITY_NAME /ea NEW_ALLOCATED_TIME
- Edit activity name:
- Delete an activity:
delete ACTIVITY_NAME - Find activities with keyword:
find KEYWORD- optional:
find KEYWORD1 / KEYWORD2for multiple keywords - optional:
find -s KEYWORDfor more specific find
- optional:
- Filter activities by tags:
filter TAG_NAME- optional:
filter TAG1 TAG2for multiple tags - optional:
filter -s TAG_NAMEfor more specific filter
- optional:
- Set a goal for tags:
goal TAG_NAME /g DURATION - Delete a goal for tags:
goal TAG_NAME /d - View goals for tags:
goal - Display graph by tags:
graph tags INTERVAL - Display graph by duration:
graph activities INTERVAL - Display graph by targets:
graph targets - Clean data files:
clean [command]- Activate auto data cleaner:
clean on - Activate auto log cleaner:
clean log on - Deactivate auto data cleaner:
clean off - Deactivate auto log cleaner:
clean log off - Specify number of files to clean for data:
clean /n NUMBER - Specify number of files to clean for logs:
clean log /n NUMBER
- Activate auto data cleaner:
- Terminate the program:
bye